Using Shared Access Signatures in Azure Templates

Did you know you can create and retrieve a Shared Access Signature (SAS) for an Azure Storage account from within an Azure Resource Manager (ARM) template?  Yeah . . . me neither!  It’s been something I’ve wanted to do on several occasions.  I usually resort to creating the storage account and SAS via some other means (Azure Portal, PowerShell, CLI, etc.), and then pass the account name and SAS token to the ARM template as parameters. Doable, but the process felt clunky.

I recently learned of a relatively new template resource function, listAccountSas.  I’m not sure when this function was added, but a quick look at the doc history seems to indicate August 2018. The official documentation does explain the basic functionality of listAccountSas, so please be sure to review that documentation.  However, there are a few topics that deserve additional detail, which is what I will cover in this post.

Input Parameters and Return Values

First, listAccountSas accepts an optional “functionValues” parameter.  For an Azure Storage account SAS, this object parameter defines scope (resource types, expiration, etc.).

{
  "signedServices": "bt",
  "signedPermission": "acluw",
  "signedExpiry": "2018-11-30T00:00:00Z",
  "signedResourceTypes": "co"
}

The documentation page suggests that “functionValues” is optional.  However, I’m not sure how the function would work without it.  I can only assume it is optional to support some future use case.  (Note: Service Bus also uses a Shared Access Signature, but it isn’t really an “account”SAS).

Next, listAccountSas returns an object.  What exactly does that mean?  The documentation page leaves it an exercise to the user to figure out. Well, I’ll show you right now:

{
  "accountSasToken": "sv=2015-04-05&ss=bt&srt=co&sp=acluw&se=2018-11-30T00%3A00%3A00.0000000Z&sig=xxxxxxxxxxxxx"
}

Most places that you want to use a SAS in an ARM template require the SAS token to be in a string format.  Therefore, to use the provided SAS token, you need to use the accountSasToken property from the resulting object.  For example:

listAccountSas(parameters('storageName'), '2018-02-01', parameters('accountSasProperties')).accountSasToken

In my opinion, listAccountSas seems like a pseudo-wrapper around the ListAccount SAS REST API for Azure Storage.  Have a look at the REST API to learn its expected request and response, and you’ll be able to apply that information to using listAccountSas as well.

Using listAccountSas

Again, the official documentation explains the basics of using listAccountSas.  There is even an example template.  What I want to see is how I would really use listAccountSas as part of an ARM template, not just to get the output value of the function itself.

For example, one case where I needed to create and use an Azure Storage account SAS was when setting up the Linux Diagnostic extension on a Virtual Machine Scale Set (VMSS) as part of an Azure Service Fabric cluster.  To configure the diagnostic extension, you will need to provide a storage account name and SAS token.  As previously mentioned,the common way to accomplish this was to create the storage account and SAS first, and then provide those values as input parameters to the ARM template. 

No more, I say!

Using the listAccountSas function, it is possible to create and use the SAS from within the template.  If needed, you can create the necessary storage account from within the same template as well.  In the case of the diagnostic extension, the configuration would be as follows:

"protectedSettings": {
      "storageAccountName": "[variables('applicationDiagnosticsStorageAccountName')]",
      "storageAccountEndPoint": "https://core.windows.net/",
      "storageAccountSasToken": "[listAccountSas(variables('applicationDiagnosticsStorageAccountName'), '2018-02-01', 
parameters('applicationDiagnosticsStorageAccountSasProperties')).accountSasToken]",
      "sinksConfig": {}
}

Summary

I’m very pleased to see listAccountSas added as a resource function for ARM templates.  This makes fully automated deployments for Azure resources much easier to develop and maintain.

Finally, I owe a special “thank you” to Robin for reviewing this post and helping to make it better.

How to Setup NVIDIA Driver on NV-Series Azure VM

I recently had the opportunity to assist on a project where a partner was using N-Series Azure VMs.  My part of this effort was developing a script to automate the setup of the VMs. To perform the VM setup and configuration, an ARM template was used.  The ARM template approach was used because doing so provided consistency with several other ARM templates being used for other parts of the project.

Setting up Azure VMs using ARM templates is common. There are many articles, blog posts, and sample templates available to help get started.  That isn’t itself especially interesting. The interesting part, at least for me, was the N-Series aspect. N-Series VMs require a separate step to install the NVIDIA driver to take advantage of the GPU capabilities of the VM.  There are instructions on how to install the driver, but those instructions assume you like to remote into the VM each time you create a VM, and then run an installation program. That’s tolerable if doing it only a few times. Any more than that, and it’s time for automation.

The v370.12 driver (which is the current version linked via the Azure documentation page) uses a self-extracting file to first extract the setup components to a directory, and then executes the setup program.  By scouring a few other blogs on performing a silent install of NVIDIA drivers, I could piece together the necessary switches to provide to the installation program to perform a silent install.

> 370.12_grid_win8_win7_server2012R2_server2008R2_64bit_international.exe -s -noreboot -clean

This tells the installation program to install silently, to not perform a reboot after the installation is complete, and to perform a clean install (restores all NVIDIA settings to the default values).

Now I need to work that it into a PowerShell script to execute via a custom script extension. By doing so, I can let ARM do its thing by provisioning the VM and related resources (NIC, Virtual Network, IP address, etc.), and then invoke a PowerShell script to install the NVIDIA driver.

The custom script extension will execute a few different steps:

  1. Download the NVIDIA driver setup file from Azure Blob storage. I put the setup file in blob storage to make sure that this specific one is the one to be used.
  2. Download a PowerShell script which will execute the NVIDIA driver setup program with parameters to do so silently.
  3. Wait for the installation program to finish
  4. Force a reboot of the VM

It should be noted that the driver installation and GPU detection can take a couple of minutes.

As you can see in the following snippets, the custom script extension and related PowerShell script are fairly trivial.

ARM Template Custom Script Extension

{
      "type": "extensions",
      "name": "CustomScriptExtension",
      "apiVersion": "2015-06-15",
      "location": "[resourceGroup().location]",
      "dependsOn": [
      	"[variables('vmName')]"
],
"properties": {
      	"publisher": "Microsoft.Compute",
      "type": "CustomScriptExtension",
      	"typeHandlerVersion": "1.8",
      "autoUpgradeMinorVersion": true,
      	"settings": {
            	"fileUris": [
                  	"[concat(variables('assetStorageUrl'), variables('scriptFileName'))]",
                        "[concat(variables('assetStorageUrl'), variables('nvidiaDriverSetupName'))]"
]
},
            "protectedSettings": {
            	"commandToExecute": "[concat('powershell -ExecutionPolicy Unrestricted -File ', variables('scriptFileName'), ' ', variables('scriptParameters'))]",
                  "storageAccountName": "[parameters('assetStorageAccountName')]",
                  "storageAccountKey": "[listKeys(concat('Microsoft.Storage/storageAccounts/', parameters('assetStorageAccountName')), '2015-06-15').key1]"
      	}
}
}

PowerShell script executed by the Custom Script Extension

<# Custom Script for Windows to install a file from Azure Storage #>
param(
    [string] $nvidiaDriverSetupPath
)

# ----- Silent install of NVidia driver -----
& ".\$nvidiaDriverSetupPath" -s -noreboot -clean

# ----- Sleep to allow the setup program to finish. -----
Start-Sleep -Seconds 120

# ----- NVidia driver installation requires a reboot. -----
Restart-Computer -Force

In this scenario, I also need to get the assets used by the custom script extension – the NVIDIA driver setup file and PowerShell script (which will execute the NVIDIA driver setup file) – uploaded to Azure Blob storage.  That can easily be accomplished with the same PowerShell script used to deploy the ARM template.  That script will perform the following tasks:

  1. Create a new resource group
  2. Create a new storage account and container
  3. Upload the NVIDIA driver setup file and related PowerShell script to the newly created storage account
  4. Execute the ARM template

You can find the full ARM template, custom script, and deployment script on my GitHub project which accompanies this post.

In order to verify it all worked, I can RDP into the VM and verify the driver installation.

This slideshow requires JavaScript.

What about unsigned drivers?

An earlier version of the NVIDIA driver, v369.95, was not digitally signed.  It was also provided as a ZIP file instead of an EXE (like v370.12).   To use this version of the NVIDIA driver, a few changes to the setup script are necessary. First, the file contents need to be extracted/unzipped.  That’s doable via some PowerShell in the script executed via the custom script extension.  Getting around the lack of a digitally signed driver is a bit more . . . interesting. If you were to install the driver manually, you would receive a prompt from Windows asking you to confirm that installing the driver is REALLY what is desired.

NVIDIA-security-prompt.png

Completing the manual installation will result in a certificate installed to the VM’s Trusted Publisher certificate store.  The certificate can then be exported and saved to Azure Blob storage.

cert-manager.png

I can use that certificate as part of the automated install process. By using the certutil.exe program it is possible to install the certificate into the Trusted Publisher store on a new VM.  This step can be included in the PowerShell script executed via the custom script extension.

An example of this approach can be found at https://github.com/mcollier/setup-nvidia-drivers-azure-vm/tree/driver-369.95.

Alternative Approach

An alternative approach is to create a custom VM image with the necessary NVIDIA driver already installed.  The advantage with this approach is you don’t have to go through the custom script step. However, any new VM deployed from such an image will still need to go through a reboot after GPU detection following the first startup. You can also add additional software or configuration as needed.  The disadvantage is you’re then accepting responsibility for keeping the VM patched on a regular basis. If you use an image provided by Microsoft, those images are patched on a regular (often at least once per month) basis.

Resources

Here are some resources which helped me in coming up with the solution presented above.

Copy Managed Images

Introduction

Azure Managed Disks were made generally available (GA) in February 2017. Managed Disks greatly simplify working with Azure Virtual Machines (VM) and Virtual Machine Scale Sets (VMSS). They effectively eliminate the need for you to have to worry about Azure Storage accounts and related VHD constraints/limits. When using managed disks for VMs or VMSS, you select the type of disk storage (SSD or HDD) and the size of disk needed. The Azure platform takes care of the rest. Besides the simplified management aspect, managed disks bring several additional benefits, but I’ll not reiterate those here, as there is a lot of good info already available (here, here and here).

While managed disks simplify management of Azure VMs, they also simplify working with VM images. Prior to managed disks, an image would need to be copied to the Storage account where the derived VM would be created. Doable, but not exactly convenient. With the introduction of managed disks, since the concept of using Storage accounts for disks and images has gone away, there is no need to copy the image. You can now create managed images as the ARM resources. You can easily create a VM by referencing the managed image, so long as the VM and image are in the same region and the same Azure subscription. You can consult the following two articles for detailed documentation on this topic:

However, what if you need to use the managed image in another Azure subscription (to which you have access)? Or, what if you need to use the managed image in another region? These capabilities are not yet available as part of the platform. However, there are workarounds you can use, with the currently available capability, to facilitate these needs.

In this post, we’ll explore the following two common scenarios:

  1. Copy a managed image to another Azure subscription
  2. Copy a managed image to another region

High Level Steps

To get a managed image in one Azure subscription to be available for use in another Azure subscription, there are a series of steps that currently need to be followed. In the near future, I expect this process to greatly be simplified by enhancements to the Azure platform’s managed image functionality. Until then, the high-level steps are as follows:

  1. Deploy a VM
  2. Configure the VM
  3. Generalize (using Sysprep) the VM
  4. Create an managed image in the source subscription
  5. Create a managed snapshot of the OS disk from the generalized VM
  6. Copy the managed snapshot to the target Azure subscription
    1. Alternative 1 – different region, same subscription
    2. Alternative 2 – different region, different subscription
  7. In the target subscription, create an managed image from the copied snapshot
  8. Optional: from the new managed image in the target subscription, create a new temporary VM
  9. Delete the snapshot in both the source and target Azure subscription
  10. Delete the temporary VM created in step #8

Getting Started

For the purposes of this post, I’m going to assume you have already created a VM using managed disks, configured it to your liking (e.g. installing some software, making configuration changes, etc.), and generalized the VM.

Create an Image

Assuming you have a generalized (deallocated) VM, the next step is to create a managed image.  It is worth pointing out that, at this time, creating the image is largely irrelevant when trying to copy the image to another region and/or subscription. As you’ll soon see, the artifact that is copied is the snapshot of disk(s) of the source (generalized) VM. The ability copy the image is not yet supported . . . hence this blog post to describe a workaround.

If you already have the Image, you can obviously skip this step. The steps are as follows:

PowerShell

<# -- Create a Managed Disk Image if necessary -- #>
$vm = Get-AzureRmVM -ResourceGroupName $resourceGroupName -Name $vmName
$image = New-AzureRmImageConfig -Location $region -SourceVirtualMachineId $vm.Id
New-AzureRmImage -Image $image -ImageName $imageName -ResourceGroupName $resourceGroupName

Azure CLI 2.0

# ------ Create an image ------
# Get the ID for the VM.
vmid=$(az vm show -g $ResourceGroupName -n vm --query "id" -o tsv)

# Create the image.
az image create -g $ResourceGroupName \
	--name $imageName \
	--location $location \
	--os-type Windows \
	--source $vmid

Create a snapshot

Now that you have an image, the next step is to create a snapshot of the OS disk of the source VM. If your image needs data disks, you’ll want to create a snapshot of the data disks as well (not shown below).

PowerShell

<# -- Create a snapshot of the OS (and optionally data disks) from the generalized VM -- #>
$vm = Get-AzureRmVM -ResourceGroupName $resourceGroupName -Name $vmName
$disk = Get-AzureRmDisk -ResourceGroupName $resourceGroupName -DiskName $vm.StorageProfile.OsDisk.Name
$snapshot = New-AzureRmSnapshotConfig -SourceUri $disk.Id -CreateOption Copy -Location $region

$snapshotName = $imageName + "-" + $region + "-snap"

New-AzureRmSnapshot -ResourceGroupName $resourceGroupName -Snapshot $snapshot -SnapshotName $snapshotName

Azure CLI 2.0

diskName=$(az vm show -g $ResourceGroupName -n vm --query "storageProfile.osDisk.name" -o tsv)
az snapshot create -g $ResourceGroupName -n $snapshotName --location $location –source $diskName

Copy the snapshot

The next step is to copy the snapshot to the target Azure subscription. In the following example, the first thing to do is grab the snapshot’s Resource ID. That ID is used to specific the source snapshot when creating the new snapshot.

PowerShell

<#-- copy the snapshot to another subscription, same region --#>
$snap = Get-AzureRmSnapshot -ResourceGroupName $resourceGroupName -SnapshotName $snapshotName

<#-- change to the target subscription #>
Select-AzureRmSubscription -SubscriptionId $targetSubscriptionId
$snapshotConfig = New-AzureRmSnapshotConfig -OsType Windows `
                                            -Location $region `
                                            -CreateOption Copy `
                                            -SourceResourceId $snap.Id

$snap = New-AzureRmSnapshot -ResourceGroupName $resourceGroupName `
                            -SnapshotName $snapshotName `
                            -Snapshot $snapshotConfig

Azure CLI 2.0

# ------ Copy the snapshot to another Azure subscription ------
# set the source subscription (to be sure)
az account set --subscription $SubscriptionID
snapshotId=$(az snapshot show -g $ResourceGroupName -n $snapshotName --query "id" -o tsv )

# change to the target subscription
az account set --subscription $TargetSubscriptionID
az snapshot create -g $ResourceGroupName -n $snapshotName --source $snapshotId

Alternative: Copy the snapshot to a different region for the same subscription

The previous examples showed how to copy the snapshot to a different subscription, with the restriction being the region for the source and target must be the same. There may be times when you need to get the snapshot to another region. The follow example shows how to copy the snapshot to another region, yet under the context of the same Azure subscription. The big difference here is the need to get at the blob which is the basis for the snapshot. That can be accomplished by getting a Shared Access Signature (SAS) for the snapshot.

PowerShell

# Create the name of the snapshot, using the current region in the name.
$snapshotName = $imageName + "-" + $region + "-snap"

# Get the source snapshot
$snap = Get-AzureRmSnapshot -ResourceGroupName $resourceGroupName -SnapshotName $snapshotName

# Create a Shared Access Signature (SAS) for the source snapshot
$snapSasUrl = Grant-AzureRmSnapshotAccess -ResourceGroupName $resourceGroupName -SnapshotName $snapshotName -DurationInSecond 3600 -Access Read

# Set up the target storage account in the other region
$targetStorageContext = (Get-AzureRmStorageAccount -ResourceGroupName $resourceGroupName -Name $storageAccountName).Context
New-AzureStorageContainer -Name $imageContainerName -Context $targetStorageContext -Permission Container

# Use the SAS URL to copy the blob to the target storage account (and thus region)
Start-AzureStorageBlobCopy -AbsoluteUri $snapSasUrl.AccessSAS -DestContainer $imageContainerName -DestContext $targetStorageContext -DestBlob $imageBlobName
Get-AzureStorageBlobCopyState -Container $imageContainerName -Blob $imageBlobName -Context $targetStorageContext -WaitForComplete

# Get the full URI to the blob
$osDiskVhdUri = ($targetStorageContext.BlobEndPoint + $imageContainerName + "/" + $imageBlobName)

# Build up the snapshot configuration, using the target storage account's resource ID
$snapshotConfig = New-AzureRmSnapshotConfig -AccountType StandardLRS `
                                            -OsType Windows `
                                            -Location $targetRegionName `
                                            -CreateOption Import `
                                            -SourceUri $osDiskVhdUri `
                                            -StorageAccountId "/subscriptions/${sourceSubscriptionId}/resourceGroups/${resourceGroupName}/providers/Microsoft.Storage/storageAccounts/${storageAccountName}"

# Create the new snapshot in the target region
$snapshotName = $imageName + "-" + $targetRegionName + "-snap"
$snap2 = New-AzureRmSnapshot -ResourceGroupName $resourceGroupName -SnapshotName $snapshotName -Snapshot $snapshotConfig

Azure CLI 2.0

az account set --subscription $SubscriptionID
snapshotId=$(az snapshot show -g $ResourceGroupName -n $snapshotName --query "id" -o tsv )

# Get the SAS for the snapshotId
snapshotSasUrl=$(az snapshot grant-access -g $ResourceGroupName -n $snapshotName --duration-in-seconds 3600 -o tsv)

# Setup the target storage account in another region
targetStorageAccountKey=$(az storage account keys list -g $ResourceGroupName --account-name $targetStorageAccountName --query "[:1].value" -o tsv)

storageSasToken=$(az storage account generate-sas --expiry 2017-05-02'T'12:00'Z' --permissions aclrpuw --resource-types sco --services b --https-only --account-name $targetStorageAccountName --account-key $targetStorageAccountKey -o tsv)
az storage container create -n $imageStorageContainerName --account-name $targetStorageAccountName --sas-token $storageSasToken

# Copy the snapshot to the target region using the SAS URL
imageBlobName = "$imageName-osdisk.vhd"
copyId=$(az storage blob copy start --source-uri $snapshotSasUrl --destination-blob $imageBlobName --destination-container $imageStorageContainerName --sas-token $storageSasToken --account-name $targetStorageAccountName)

# Figure out when the copy is destination-container
# TODO: Put this in a loop until status is 'success'
az storage blob show --container-name $imageStorageContainerName -n $imageBlobName --account-name $targetStorageAccountName --sas-token $storageSasToken --query "properties.copy.status"

# Get the URI to the blob

blobEndpoint=$(az storage account show -g $ResourceGroupName -n $targetStorageAccountName --query "primaryEndpoints.blob" -o tsv)
osDiskVhdUri="$blobEndpoint$imageStorageContainerName/$imageBlobName"

# Create the snapshot in the target region
snapshotName="$imageName-$targetLocation-snap"
az snapshot create -g $ResourceGroupName -n $snapshotName -l $targetLocation --source $osDiskVhdUri

Alternative: Copy the snapshot to a different region for a different subscription

The previous example showed how to copy the snapshot to a different region, yet associated with the same subscription. In the following example, we’ll tweak the example script a bit to show copying the snapshot to a different region and a different subscription.

These three examples should cover the scenarios needed to get the snapshot wherever it needs to be. From there, the steps to create the image should be the same, since they all start with the snapshot.

PowerShell

# Create the name of the snapshot, using the current region in the name.
$snapshotName = $imageName + "-" + $region + "-snap"

# Get the source snapshot
$snap = Get-AzureRmSnapshot -ResourceGroupName $resourceGroupName -SnapshotName $snapshotName

# Create a Shared Access Signature (SAS) for the source snapshot
$snapSasUrl = Grant-AzureRmSnapshotAccess -ResourceGroupName $resourceGroupName -SnapshotName $snapshotName -DurationInSecond 3600 -Access Read

# Set up the target storage account in the other region and subscription
Select-AzureRmSubscription -SubscriptionId $targetSubscriptionId

$targetStorageContext = (Get-AzureRmStorageAccount -ResourceGroupName $targetResourceGroupName -Name $targetStorageAccountName).Context
New-AzureStorageContainer -Name $imageContainerName -Context $targetStorageContext -Permission Container

# Use the SAS URL to copy the blob to the target storage account (and thus region)
Start-AzureStorageBlobCopy -AbsoluteUri $snapSasUrl.AccessSAS -DestContainer $imageContainerName -DestContext $targetStorageContext -DestBlob $imageBlobName
Get-AzureStorageBlobCopyState -Container $imageContainerName -Blob $imageBlobName -Context $targetStorageContext -WaitForComplete

# Get the full URI to the blob
$osDiskVhdUri = ($targetStorageContext.BlobEndPoint + $imageContainerName + "/" + $imageBlobName)

# Build up the snapshot configuration, using the target storage account's resource ID
$snapshotConfig = New-AzureRmSnapshotConfig -AccountType StandardLRS `
                                            -OsType Windows `
                                            -Location $targetRegionName `
                                            -CreateOption Import `
                                            -SourceUri $osDiskVhdUri `
                                            -StorageAccountId "/subscriptions/${targetSubscriptionId}/resourceGroups/${targetResourceGroupName}/providers/Microsoft.Storage/storageAccounts/${targetStorageAccountName}"

# Create the new snapshot in the target region
$snapshotName = $imageName + "-" + $targetRegionName + "-snap"
$snap2 = New-AzureRmSnapshot -ResourceGroupName $resourceGroupName -SnapshotName $snapshotName -Snapshot $snapshotConfig

Azure CLI 2.0

az account set --subscription $SubscriptionID
snapshotId=$(az snapshot show -g $ResourceGroupName -n $snapshotName --query "id" -o tsv )

# Get the SAS for the snapshotId
snapshotSasUrl=$(az snapshot grant-access -g $ResourceGroupName -n $snapshotName --duration-in-seconds 3600 -o tsv)

# Switch to the DIFFERENT subscription
az account set --subscription $TargetSubscriptionID

# Setup the target storage account in another region
targetStorageAccountKey=$(az storage account keys list -g $ResourceGroupName --account-name $targetStorageAccountName --query "[:1].value" -o tsv)

storageSasToken=$(az storage account generate-sas --expiry 2017-05-02'T'12:00'Z' --permissions aclrpuw --resource-types sco --services b --https-only --account-name $targetStorageAccountName --account-key $targetStorageAccountKey -o tsv)

az storage container create -n $imageStorageContainerName --account-name $targetStorageAccountName --sas-token $storageSasToken

# Copy the snapshot to the target region using the SAS URL
imageBlobName = "$imageName-osdisk.vhd"
copyId=$(az storage blob copy start --source-uri $snapshotSasUrl --destination-blob $imageBlobName --destination-container $imageStorageContainerName --sas-token $storageSasToken --account-name $targetStorageAccountName)

# Figure out when the copy is destination-container
# TODO: Put this in a loop until status is 'success'
az storage blob show --container-name $imageStorageContainerName -n $imageBlobName --account-name $targetStorageAccountName --sas-token $storageSasToken --query "properties.copy.status"

# Get the URI to the blob
blobEndpoint=$(az storage account show -g $ResourceGroupName -n $targetStorageAccountName --query "primaryEndpoints.blob" -o tsv)
osDiskVhdUri="$blobEndpoint$imageStorageContainerName/$imageBlobName"

# Create the snapshot in the target region
snapshotName="$imageName-$targetLocation-snap"
az snapshot create -g $ResourceGroupName -n $snapshotName -l $targetLocation --source $osDiskVhdUri

Create an Image (in target subscription)

Once the snapshot has been copied to the target Azure subscription, the next step is to use the snapshot as a basis for creating a new managed image. Be sure to proceed to the next step (Create a temporary VM from the Image) don’t stop here!

PowerShell

<# -- In the second subscription, create a new Image from the copied snapshot --#>
Select-AzureRmSubscription -SubscriptionId $targetSubscriptionId

$snap = Get-AzureRmSnapshot -ResourceGroupName $resourceGroupName -SnapshotName $snapshotName

$imageConfig = New-AzureRmImageConfig -Location $destinationRegion

Set-AzureRmImageOsDisk -Image $imageConfig `
                        -OsType Windows `
                        -OsState Generalized `
                        -SnapshotId $snap.Id

New-AzureRmImage -ResourceGroupName $resourceGroupName `
                 -ImageName $imageName `
                 -Image $imageConfig

Azure CLI 2.0

az account set --subscription $TargetSubscriptionID
snapshotId=$(az snapshot show -g $ResourceGroupName -n $snapshotName --query "id" -o tsv )
az image create -g $ResourceGroupName -n $imageName -l $location --os-type Windows --source $snapshotId

Optional: create a temporary VM from the Image (in target subscription)

Earlier, when you created the snapshot and copied it to the target Azure subscription, you may have noticed the process went relatively quick. One reason for this is how Azure copies the data – it uses a copy-on-read process. Meaning, the full dataset isn’t copied until it is needed. To trigger the data to be fully copied, a VM can be created. The VM created in this step is used to trigger the data transfer, and then we can safely delete the VM and snapshots. This step can be considered optional – as the first time a VM is created from the snapshot, doing so will ensure the data is fully copied.

In the example below, I’m using an ARM template to provision the new (temporary) VM. This template is very similar to this one, expect that I’ve modified the one I’m using to allow for the use of a managed image.

PowerShell

<# -- In the second subscription, create a new VM from the new Image. -- #>
$currentDate = Get-Date -Format yyyyMMdd.HHmmss
$deploymentLabel = "vmimage-$currentDate"

$image = Get-AzureRmImage -ResourceGroupName $resourceGroupName -ImageName $imageName

<# -- Get a random series of letters to help with making a somewhat unique DNS suffix. -- #>
$dnsPrefix = "myvm-" + -join ((97..122) | Get-Random -Count 7 | ForEach-Object {[char]$_})

$creds = Get-Credential -Message "Enter username and password for new VM."

$templateParams = @{
    vmName = $vmName;
    adminUserName = $creds.UserName;
    adminPassword = $creds.Password;
    dnsLabelPrefix = $dnsPrefix
    managedImageResourceId = $image.Id
}

# Put the dummy VM in a separate resource group as it makes it super easy to clean up all the extra stuff that goes with a VM (NIC, IP, VNet, etc.)
$rgNameTemp = $resourceGroupName + "-temp"
New-AzureRmResourceGroup -Location $region `
                         -Name $rgNameTemp

New-AzureRmResourceGroupDeployment  -Name $deploymentLabel `
                                    -ResourceGroupName $rgNameTemp `
                                    -TemplateParameterObject $templateParams `
                                    -TemplateUri 'https://raw.githubusercontent.com/mcollier/copy-azure-managed-disk-images/master/azuredeploy.json' `
                                    -Verbose

Azure CLI 2.0

az group create -l $location -n $resourceGroupTempName
imageId=$(az image show -g mcollier-managed-image -n image2 --query "id")
az group deployment create -g resourceGroupTempName --template-uri https://raw.githubusercontent.com/mcollier/copy-azure-managed-disk-images/master/azuredeploy.json --parameters "{\"vmName\":{\"value\": \"$vmName\"}, \"adminUsername\":{\"value\": \"$user\"}, \"adminPassword\":{\"value\": \"$pwd\"}, \"dnsLabelPrefix\":{\"value\": \"$dnsPrefix\"}, \"managedImageResourceId\":{\"value\": \"$imageId\"}}"

Delete the snapshots

Since the new image and temporary VM have been created in the target subscription, there is no longer a need for the snapshot. You would want to delete the snapshot in both the source and target Azure subscription.

PowerShell

<# -- Delete the snapshot in the second subscription -- #>
Remove-AzureRmSnapshot -ResourceGroupName $resourceGroupName -SnapshotName $snapshotName -Force

Azure CLI 2.0

az snapshot delete -g $resourceGroupName -n $snapshotName

Delete the temporary VM

Earlier there was a step to create a temporary VM. The VM was created to trigger the data copy process. It serves no other purpose at this point, thus it is safe to delete. If you followed the earlier steps to create the temporary VM, it was created in its own resource group. Thus, simply delete the resource group.
PowerShell

Remove-AzureRmResourceGroup -Name $rgNameTemp -Force

Azure CLI 2.0

az group delete -n $resourceGroupName

Summary

As you can see, there are several steps necessary to copy a Managed Disk Image from one Azure subscription to another. The steps aren’t difficult, just a bit unintuitive at this point. This post should help make the process a bit easier to understand. When the ability to copy images across subscriptions and regions is available as a first-class feature in Azure (hopefully later this year), this post will be effectively obsolete. I’m OK with that.  🙂

Resources / More Information


I would like to thank Chetan Agarwal and Neil Mackenzie for their assistance in reviewing this post.

Office Add-In Development: The Need for Office.js

Recently I had the opportunity to do a little (and I mean “little” in the most literal sense) Office add-in development. If you follow me on this blog or Twitter, you know that I work primarily in the Azure space. Building an Office add-in is certainly new to me, but I figured it would be kind of fun to learn about something new. This journey started as a result of a partner that I worked with who was having problems getting their add-in to load correctly in both Word Online and Word (on their desktop).  Odd . . . right?  It should work the same when hosted in both Office Online apps and Office.

I knew from prior reading, that the “new” Office add-in model was (to likely over simplify) essentially creating a web application that would be hosted within an Office desktop (e.g. Word 2016) or Office online (e.g. Word online) application. If the add-in needed to interact with the Word, Excel, Outlook environment in any way, there is a JavaScript API to do so. Seems easy enough.

To get started, I did a little Binging (just sounds odd . . . but whatever) for Office add-in development. I wanted to start with “official” Microsoft documentation, so I ignored results from StackOverflow.com and blogs (wait . . what if it is my blog . . .this blog . . .)  One of the top results was the “Office Add-ins platform overview” page at https://dev.office.com/docs/add-ins/overview/office-add-ins.  Sweeta!

Reading . . .reading . . . reading

Finally, I get to something that looks like code  . . .well at least a picture of code, at https://dev.office.com/docs/add-ins/overview/office-add-ins#anatomy-of-an-office-add-in.  This section states that the minimal version of an add-in is a “static HTML page that is displayed inside an Office application, but doesn’t interact with either the Office document or any other Internet resource.”  I can do that!  I’ll simply write a “Hello World” app to just see it work, and then go from there.  The page includes a picture of two components needed for a “Hello Word” Office add-in, the manifest file and the web page.  Bam!

hello-world

I created the most basic HTML page . .  . which just happened to look exactly like the one in the picture. I then proceeded to read up on how to debug the add-in via sideloading the add-in via Office and Office Online.  This is easy!

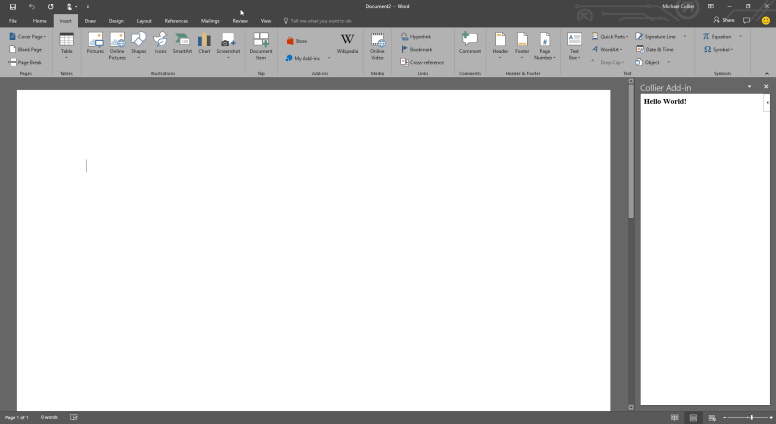
I started by sideloading the add-in via Word (desktop). Hot damn . . . it worked!!

office-desktop-word-addin-1

I then decided to push my luck and try it on Office Online.  FAIL!

office-online-word-addin-1

Ok . . . so hit the “RETRY” button? Wait for the spinny icon to go away . . . . FAIL, again!

office-online-word-addin-2

Ok . . . . um. . . . WTF?  Hit “START”?  Sure . . what’s the worst that could happen?  It worked!!

office-online-word-addin-3

This is where, as a developer, I start to question my life choices. I also realize there must be something else going on causing this funkiness. I tried the normal browser rotation game – Chrome, Edge, IE – all produced the same results. Hmmmm.

I decided to do some more reading. I found this page, https://dev.office.com/docs/add-ins/get-started/create-an-office-add-in-using-any-editor, which promised to give me a working sample. I followed it, and it worked. So, what was different (besides being a whole lot more code)?  As I dug around the generated code, I noticed the home.html file contained two JavaScript references, one for jQuery and one for office.js. I could understand the jQuery one, but what’s this office.js thing?  It must be the API used to interact with Office apps. Ok . . . but my “Hello World” app isn’t doing anything with Office apps.  What gives?

This lead me to discover the “Understanding the JavaScript API for Office” page.  I noticed this block of seemingly normal text:

“All pages within an Office Add-ins are required to assign an event handler to the initialize event, Office.initialize. If you fail to assign an event handler, your add-in may raise an error when it starts. Also, if a user attempts to use your add-in with an Office Online web client, such as Excel Online, PowerPoint Online, or Outlook Web App, it will fail to run. If you don’t need any initialization code, then the body of the function you assign to Office.initialize can be empty, as it is in the first example above.”

YES! YES!!  That would have been good information a few hours ago . . . . as on that “Hello World” page with the simple HTML example code.  Put some big, red blinky arrows around this, for Pete’s sake!

I proceeded to add the most basic office.js initialization code to my sample “Hello World” page (which just happens to be hosted on Azure Web Apps, with a local Git continuous deployment option . . . see, I had to get Azure in here somewhere).

code-final

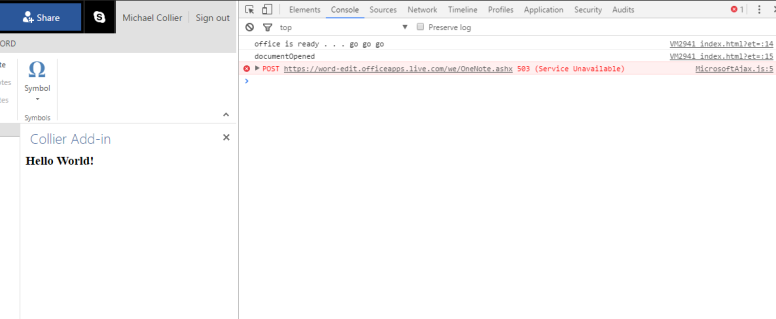
I proceeded to reload my add-in in Word online. It worked!  The simple console.log() statements showed up in the JavaScript console too. Yippie!!

office-online-word-addin-4


That’s a lovely story . . .what’s the point?

If the documentation example seems too simple to be true, it probably is?  Eh . . . sometimes.  The point here is that for Office add-ins, you are absolutely required to reference office.js and at least set up an empty initialization block.  Doing so helps Office in setting up some of the logical infrastructure needed for the add-in environment. It’s like magic. Only magic isn’t real. Mostly.

Connect to Azure SQL Database by Using Azure AD Authentication

One of the great features recently added to Azure SQL Database is the ability to authenticate to Azure SQL Database using Azure Active Directory. This provides an alternative to exclusively using SQL credentials. By leveraging Azure AD authentication, you can greatly simplify management of database permissions by continuing to use existing identities, as well as leveraging AD groups.

The article here does a decent job of explaining the basics of how Azure AD authentication with SQL Database works, and the steps needed to do so. One area that it doesn’t yet cover is obtaining an Azure AD authentication token and using that token to authenticate with SQL Database.  Actually  . . . it does, sort of. The article assumes a certificate will be used. That isn’t always the case. In the following sections, I will show you how to obtain an Azure AD authentication token for a user (in Azure AD directory), and use that token for authentication with SQL Database.

Prerequisites

Before we get started, be sure to follow steps 1 through 6 in the Connecting to SQL Database or SQL Data Warehouse By Using Azure Active Directory Authentication article.  I consider these the prerequisite steps. You just have to do it.

Overview

The process to use an Azure AD authentication token with SQL Database can be broken down into several distinct steps:

Let’s review each of these in a bit more detail.

Register an application in Azure AD

For the purposes of this example, let’s keep it simple and use a native (console) application. We’ll use the (new) Azure Portal here. Similar steps can be done in the classic Azure portal as well.

  1. Navigate to the Azure Active Directory section
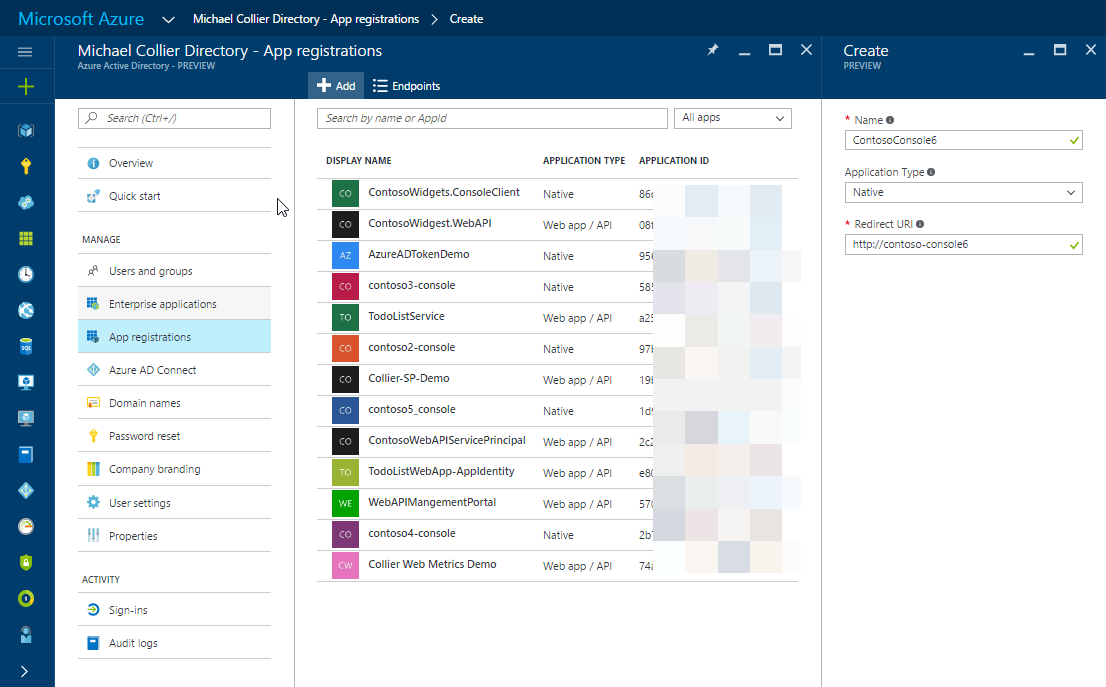
  2. Select App registrations, and then the + Add button
  3. On the resulting Create blade, provide a friendly name, select an application type of Native, and provide a redirect URL (which is largely irrelevant in this scenario for a native console application)

register-azure-ad-natitve-app

Add Azure SQL Database to the list of APIs which will require permission from your application

This step is very important. You will need to add Azure SQL Database to the list of APIs / applications which will be granted delegated permission via your application. Failure to do this will result in an error message similar to the following:

“AADSTS65001: The user or administrator has not consented to use the application with ID ‘{your-application-id-here}’. Send an interactive authorization request for this user and resource.”

Before you can continue, you need to have followed the prerequisites steps stated at the top of this post. You especially need to be sure you have created an Azure AD contained database user. If you fail to do that, you will not see “Azure SQL Database” in the list (as specified below).

Setting the permission is fairly easy via the Azure portal.

  1. Select the newly created application (in this case, it was ContosoConsole6)
  2. On the Settings blade, select Required permissions.
  3. Add a new required permission and select Azure SQL Database as the API. You’ll want to search for “azure” to get “Azure SQL Database” to appear in the list.

select azure sql database delegated permission.png

Be sure to select the checkbox for “Access Azure SQL DB and Data Warehouse”.

select-azure-sql-database-delegated-permission-2

I should point out that even after adding the delegated permission as shown above, you will still get the previously mentioned error. We’ll solve that next.

Consent to allow your application to access Azure SQL Database

That error you received before about the administrator having not consented to use application is something we need to get past. To do so, you can force a one-time consent dialog so you can consent to your application delegating access to Azure SQL Database. You’ll need to craft a URL in the following format (wrapped for readability):

https://login.microsoftonline.com/%5Byour-tenant%5D.onmicrosoft.com/oauth2/authorize
?client_id=[your-client-application-id]
&response_type=id_token&nonce=1234&scope=openid&prompt=admin_consent

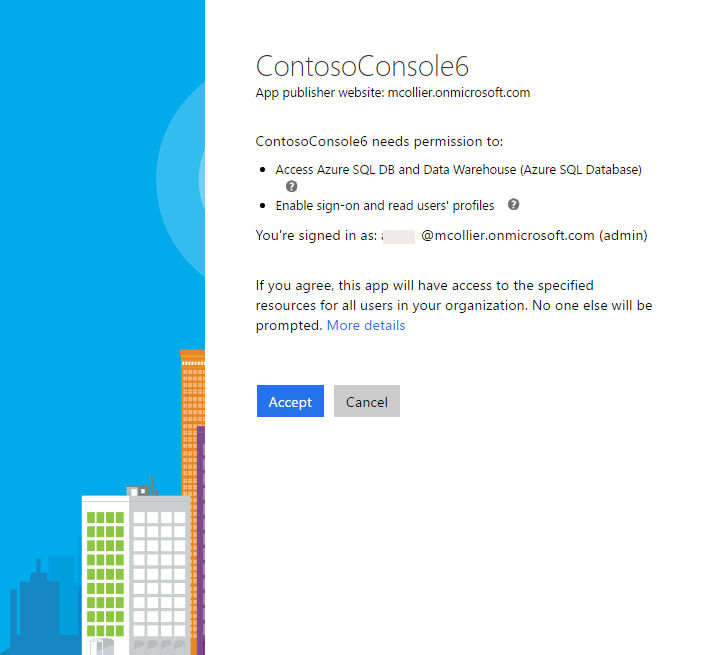
Paste that URL into your favorite browser window and go. You should be prompted to log into your Azure subscription. Do so as a Global Administrator for your Azure AD tenant.

azure-ad-consent-prompt

With the above steps complete, you should now be able to write the code for the sample app to obtain and use the Azure AD authentication token with Azure SQL Database.

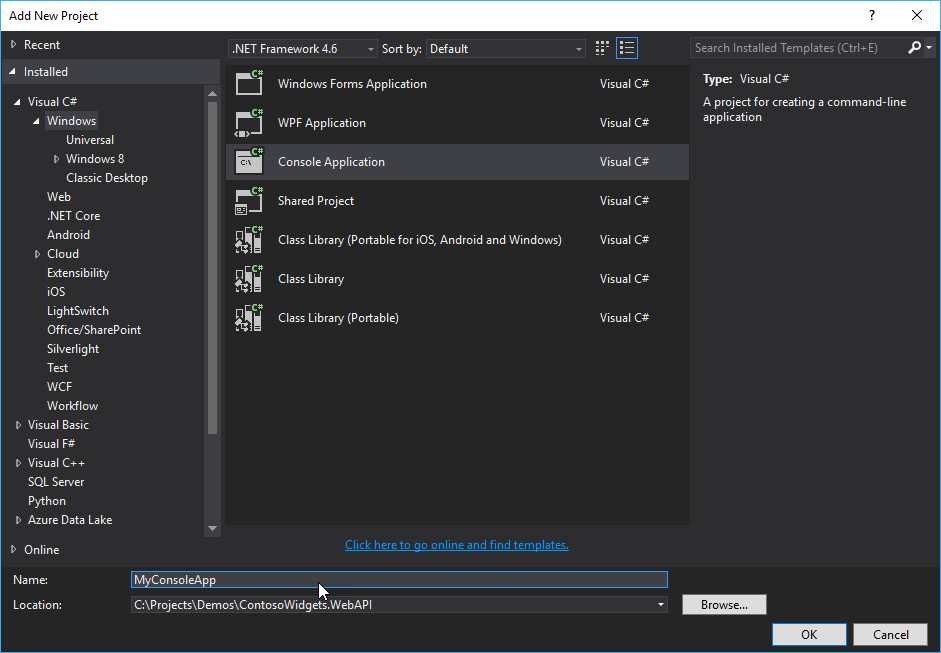
Create a .NET 4.6 console application

Make sure your console project targets .NET Framework 4.6. The SqlConnection.AccessToken property used to set the Azure AD authentication token is available in .NET 4.6 only.

new-console-app

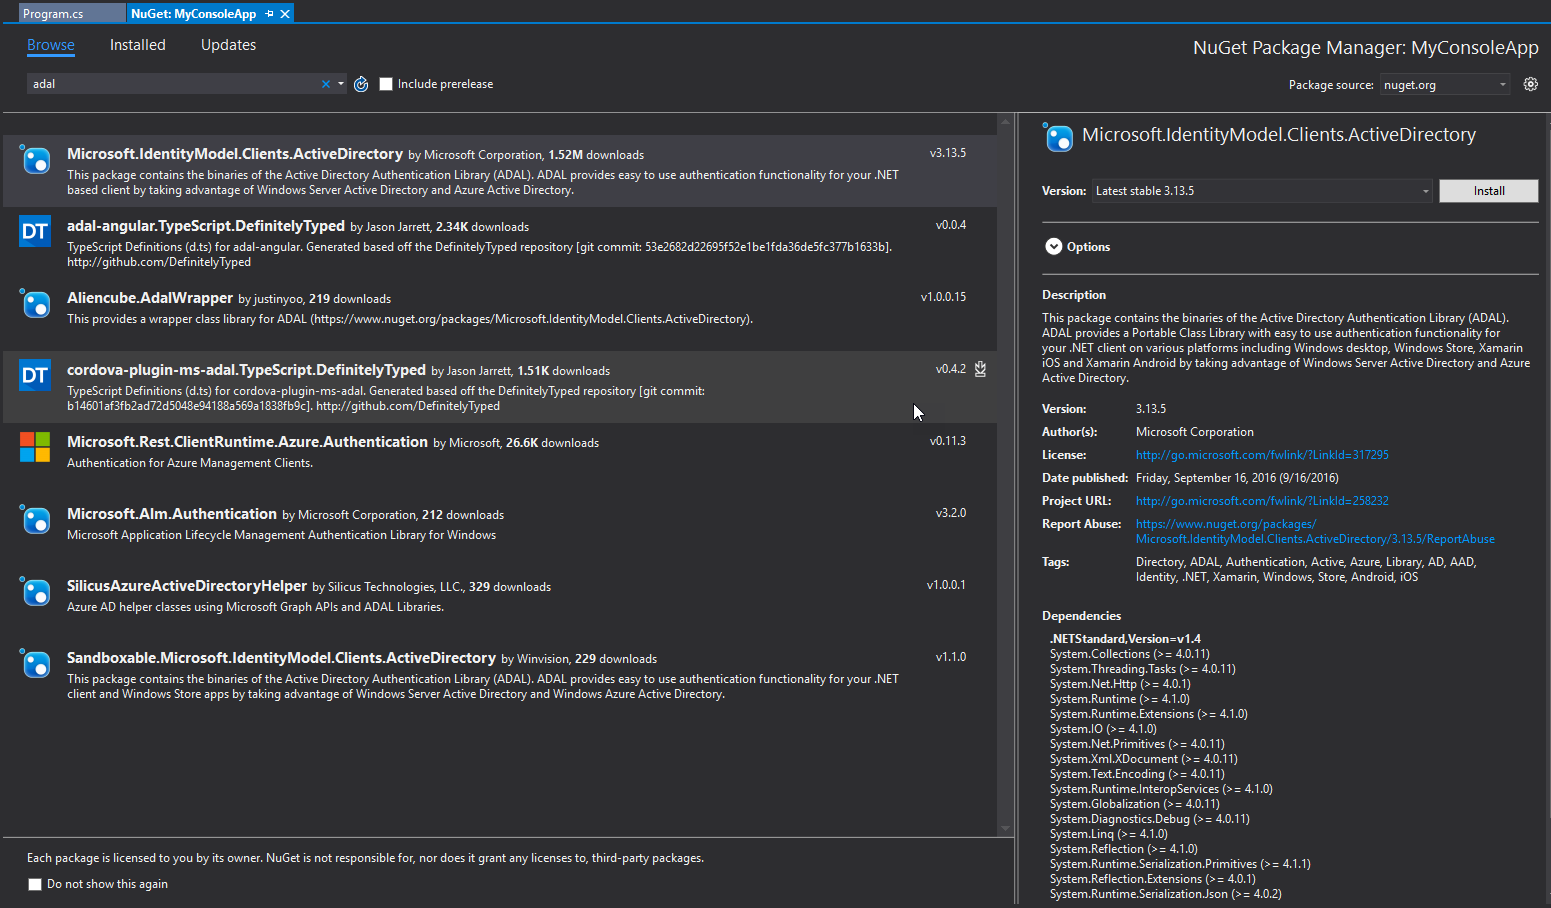
Add the Active Directory Authentication Library (ADAL) to the project via NuGet

Since you’ll be working with Azure AD, you’ll want to use ADAL to make getting the Azure AD authentication token easy.

Add ADAL Nuget.png

Add code to obtain an Azure AD authentication token

Finally! Some code! First, in my example, I set up a few constants which represent information about Azure AD and the resource for which I want to obtain an authentication token. For SQL Database, the resource is https://database.windows.net/.

private const string AadInstance = "https://login.windows.net/{0}";
private const string ResourceId = "https://database.windows.net/";

You’ll need a client ID as part of the call to AcquireTokenAsync(). The client ID is the Application ID for your app registered in Azure AD.  The Azure AD tenant value is the friendly name for your Azure AD tenant (e.g. contoso.onmicrosoft.com). Thanks to using ADAL, the code to get the authentication token is very easy – just two lines of code:

string clientId = ConfigurationManager.AppSettings["ClientId"];
string aadTenantId = ConfigurationManager.AppSettings["Tenant"];
AuthenticationContext authenticationContext =
  new AuthenticationContext(string.Format(AadInstance, AadTenantId));

AuthenticationResult authenticationResult =
  authenticationContext.AcquireTokenAsync(ResourceId,
                                          clientId,
                                          GetUserCredential()).Result;

You’ll notice the above code calls a method GetUserCredential()  to obtain a UserCredential object. This represents the Azure AD user for which to obtain the authentication token. In this example, the user details are hard coded. Yes, this is bad. I’m showing it here strictly as an example. In future posts, I’ll show a few other ways to (better) handle the user details.

private static UserCredential GetUserCredential()
{
   string pwd = ConfigurationManager.AppSettings["UserPassword"];
   string userId = ConfigurationManager.AppSettings["UserId"];

   SecureString securePassword = new SecureString();

   foreach (char c in pwd) { securePassword.AppendChar(c); }
   securePassword.MakeReadOnly();

   var userCredential = new UserPasswordCredential(userId, securePassword);

   return userCredential;
}

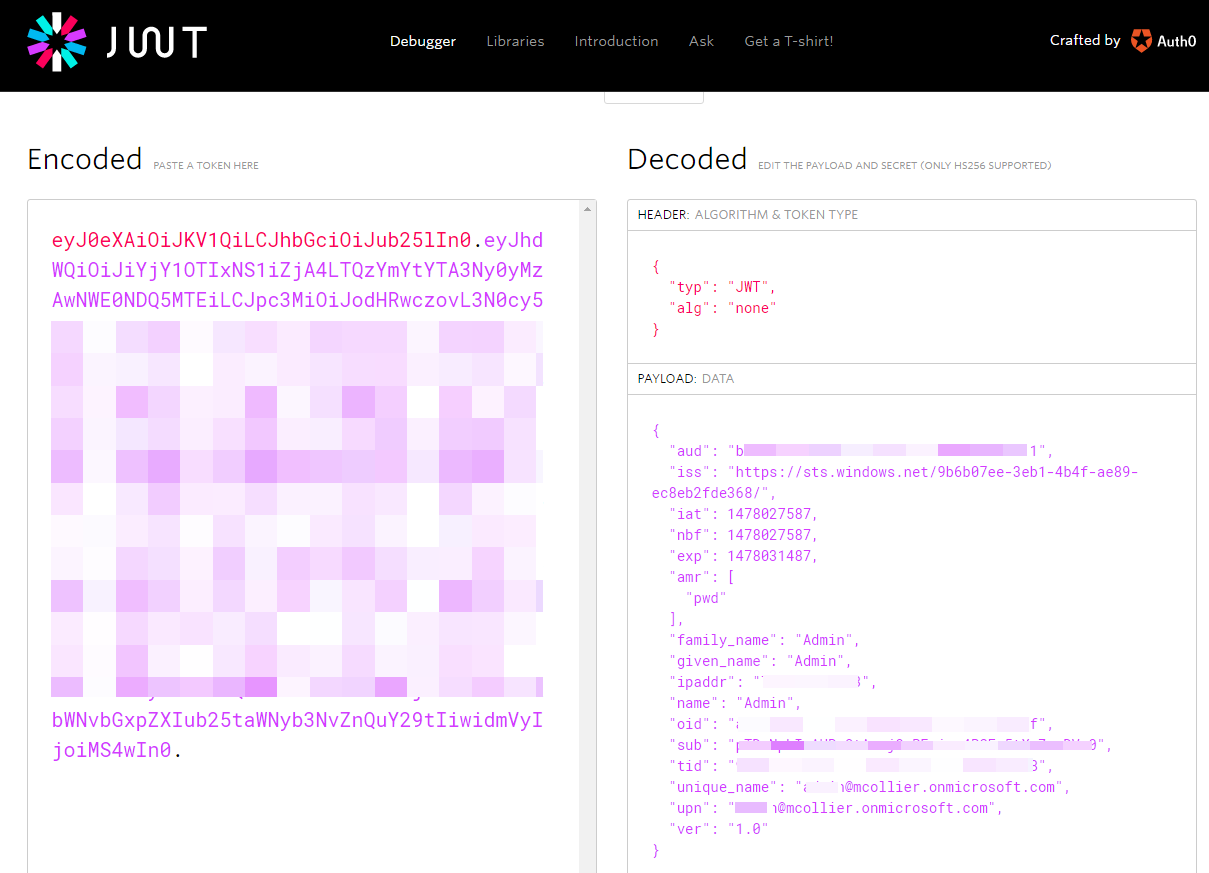
If all goes well, after executing the AcquireTokenAsync() method you should receive an  Azure AD (JWT) authentication token as part of the resulting AuthenticationResult object. For fun, paste it in at https://jwt.io to decode it. You should get something similar to the screenshot below.

jwt-screenshot

Add code which uses Azure AD authentication token to authenticate with SQL Database

This is the easy part. You just need some code which gets a basic database connection string, and then sets the SQL connection to use the previously obtained authentication token.

The database connection string is going to be very basic, containing nothing more than the data source (your Azure SQL Database server name), the database name, and a connection timeout.

Data Source=[your-server-name-here].database.windows.net;
Initial Catalog=[your-db-name-here];Connect Timeout=30

The following code to query the database is ultra-simple. I just want to make sure the connection is successful and I can execute a basic command. This command will return the name of the connected user . . . which should correspond to that of the specified Azure AD user.

var sqlConnectionString = ConfigurationManager.ConnectionStrings["MyDatabase"].ConnectionString;
using (SqlConnection conn = new SqlConnection(sqlConnectionString))
{
  conn.AccessToken = authenticationResult.AccessToken;
  conn.Open();

  using (SqlCommand cmd = new SqlCommand("SELECT SUSER_SNAME()", conn))
  {
    var result = cmd.ExecuteScalar();
    Console.WriteLine(result);
  }
}

That’s it. Done.

Summary

As you can hopefully see, the steps to using an Azure AD authentication token with Azure SQL Database are not especially complicated. There are a few minor hoops to jump through, but nothing too serious.

It is worth pointing out that this solution does take a dependency on Azure AD. In the unlikely event that Azure AD is unavailable, then you may be unable to access your database resources using your Azure AD credential. I think it is a wise strategy to also keep a few SQL identities in place and have a process ready to use those  – just in case. After all, designing robust applications for the cloud is about designing for failure. Always be prepared.

You can find the full source code for this project on my personal GitHub repository.

My New Azure Book

Last week Microsoft Press released the latest update to my book, Microsoft Azure Essentials: Fundamentals of Azure, Second Edition.   As the name indicates, this is an update to Microsoft Azure Essentials: Fundamental of Azure released in February 2015. I worked on both editions with my friend Robin Shahan.

The first edition of the book was relatively popular, with over 200,000 copies either downloaded or distributed in print. Thank you for the amazing support! I’m very happy so many people found the book to be helpful.fundamentalsofazure2e-thumbnail

When the Microsoft Press editor that worked on the first book initially approached me about working on an update, I was honestly a bit hesitant. Writing a technical book is a lot of work . . . especially a book on a platform such as Azure that seems to be constantly evolving. However, after many discussions with Robin, and my wife (getting spousal approval was very important as this effort would require many nights and weekends away from my family, which added a new baby to the party earlier this year), I decided to write the update. Thankfully Robin agreed to join in on the fun too. She’s a lot of fun to work with!

My thinking going into this process was there would be a few significant updates, but mostly it would be changing a few screenshots, updating a product name or two (i.e. Azure Web Sites became Azure Web Apps), and maybe including a bit of content around new services like Azure Service Fabric. It wouldn’t be that much work. Wrong!

Azure is a fast-moving platform. In the nearly 13 months since the first edition of the book was released to when I got started on the second edition, many things had changed. The second edition contains quite a few significant updates. The sections on Azure Web Apps, Azure Virtual Machines, Virtual Networks, Storage, and management tooling all received major edits. Key concepts such as Azure Resource Manager, use of the (new) Azure Portal, and the (almost entire) removal of Azure Cloud Services also received increased focused in the second edition. We also added a new chapter on Additional Azure Services which provides a brief introduction to several other Azure services Robin and I felt were important to understand. There are so many valuable services in the Azure platform, but we couldn’t discuss all of them in the book (or else we still might be working on the book, and it would be huge). These are services we personally felt were of significance for the broad majority of people. (Robin adds more info on the changes in her comment here.)

I would be remiss if I didn’t once again thank the Azure experts that volunteered their precious time to help review the book. Many of these people helped on the first edition too. Their expertise and honest feedback was critical in writing this book. Thank you!

I hope you find the second edition of the book to be a valuable asset to your journey to the public cloud with Microsoft Azure!


Work on Your ARM Strength

Last month I had the privilege to speak at one of the many excellent technology conferences in the Midwest, StirTrek. It’s always fun to speak, and attend, StirTrek. Not only are the sessions great, but afterwards there is a showing of one of the summer’s biggest movies. This year the movie was Captain America: Civil War.

My session this year was “Work on Your ARM Strength”. The goal with the session was to provide some guidance on how to write Azure Resource Manager (ARM) templates. ARM templates are a key part of working with Azure, and it is important to understand how to write, debug, and deploy them.

StirTrek did an excellent job in recording this year’s sessions. You can view all the session on StirTrek’s YouTube channel. You can watch my “Work on Your ARM Strength” session here, or via the embedded video below. Enjoy!

Retrieving Resource Metrics via the Azure Insights API


There are many options for configuring monitoring and alerting for Azure resources. The Azure portal will show some default metrics. It is also possible to enable more advanced or custom diagnostic settings. The links below provide additional details on enabling diagnostics and monitoring for two popular Azure compute resources, Azure Web Apps and Azure Virtual Machines. Visual Studio Application Insights can also be leveraged to monitor the usage and performance of applications.

As previously mentioned, the Azure portal will show some default metrics for many Azure resources. For example, the screenshot below shows the monitoring tile for an Azure Web App, which has been configured to display three key values: Average Response Time, CPU Time, and Requests.

azure_web_app_default_metric_tile


The metric values displayed on this tile are not retained indefinitely. For an Azure Web App, the retention policy is as follows:

  • Minute granularity – 24 hour retention
  • Hour granularity – 7 day retention
  • Daily granularity – 30 day retention

By using the Azure Insights API it is possible to programmatically retrieve the available default metric definitions (the type of metric such as CPU Time, Requests, etc.), granularity, and metric values. With the ability to programmatically retrieve the data, comes the ability to save the data in a data store of your choosing. For example, that data could be persisted to Azure SQL Database, DocumentDB, or Azure Data Lake. From there you could perform whatever additional analysis is desired.

It should be noted that the Azure Insights API is not the same as Application Insights.

Besides working with various metric data points, the Insights API allows you to manage things like alerts, autoscale settings, usage quotas, and more. Check out the full list via the Azure Insights REST API Reference documentation.

The remainder of this post will discuss using the Insights API to learn more about the default metrics available for Azure resources.

Investigating Available Metrics via the Insights REST API

There are three basic steps for working with the Insights REST API:

  1. Authenticate the Azure Insights request
  2. Retrieve the available metric definitions
  3. Retrieve the metric values

The first step is to authenticate the Azure Insights API request. As the Azure Insights API is an Azure Resource Manager based API, it requires authentication via Azure Active Directory (Azure AD). The easiest way (in my opinion at least) to set up authentication is by creating an Azure AD service principal and retrieve the authentication (JWT) token. The sample script below demonstrates creating an Azure AD service principle via PowerShell. For a more detailed walkthrough, please reference the guidance at https://azure.microsoft.com/en-us/documentation/articles/resource-group-authenticate-service-principal/#authenticate-service-principal-with-password—powershell. It is also possible to create a service principle via the Azure portal.

Create a Service Principle
  1. # Instructions at https://azure.microsoft.com/en-us/documentation/articles/resource-group-authenticate-service-principal/
  2. $pwd = “[your-service-principle-password]”
  3. $subscriptionId = “[your-azure-subscription-id]”
  4. Login-AzureRmAccount
  5. Select-AzureRmSubscription -SubscriptionId $subscriptionId
  6. $azureAdApplication = New-AzureRmADApplication `
  7.                         -DisplayName “Collier Web Metrics Demo” `
  8.                         -HomePage https://localhost/webmetricdemo&#8221; `
  9.                         -IdentifierUris https://localhost/webmetricdemo&#8221; `
  10.                         -Password $pwd
  11. New-AzureRmADServicePrincipal -ApplicationId $azureAdApplication.ApplicationId
  12. New-AzureRmRoleAssignment -RoleDefinitionName Reader -ServicePrincipalName $azureAdApplication.ApplicationId
  13. $subscription = Get-AzureRmSubscription -SubscriptionId $subscriptionId
  14. $creds = Get-Credential -UserName $azureAdApplication.ApplicationId -Message “Please use your service principle credentials”
  15. Login-AzureRmAccount -Credential $creds -ServicePrincipal -TenantId $subscription.TenantId

Once the authentication setup step is complete, it is possible to execute queries against the Azure Insights REST API. There are two helpful queries:

  1. List the metric definitions for a resource
  2. Retrieve the metric values

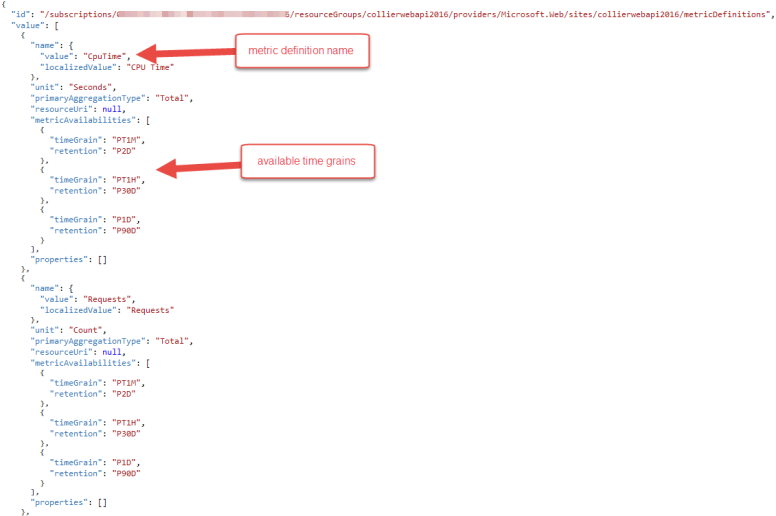
Details on listing the metric definitions for a resource is documented at https://msdn.microsoft.com/en-us/library/azure/dn931939.aspx. For an Azure Web App, the metric definitions should look similar to example screenshot below.

azure_web_app_metric_definitions_with_pointers


Once the available metric definitions are known, it is easy to retrieve the required metric values. Use the metric’s name ‘value’ (not the ‘localizedValue’) for any filtering requests (e.g. retrieve the ‘CpuTime’ and ‘Requests’ metric data points). The request / response information for this API call do not appear as an available task at https://msdn.microsoft.com/en-us/library/azure/dn931930.aspx. However, it is possible to do so, and the request URI is very similar to that of listing the metric definitions.

Method Request URI
GET https://management.azure.com/subscriptions/{subscription-id}/resourceGroups/{resource-group-name}/providers/{resource-provider-namespace}/{resource-type}/{resource-name}/metrics?api-version=2014-04-01&$filter={filter}

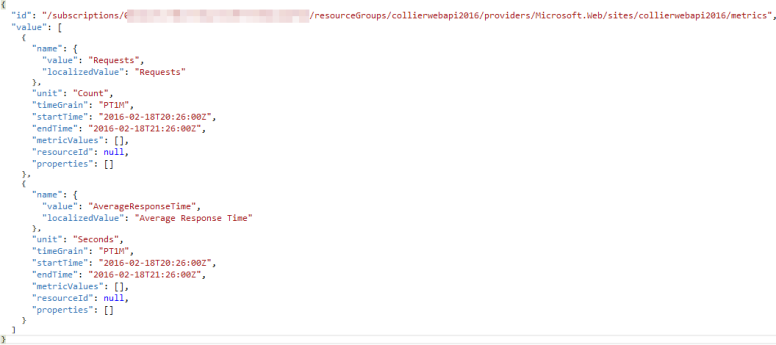
For example, to retrieve just the Average Response Time and Requests metric data points for an Azure Web App for the 1 hour period from 2016-02-18 20:26:00 to 2016-02-18 21:26:00, with a granularity of 1 minute, the request URI would be as follows:

https://management.azure.com/subscriptions/{subscription-id}/resourceGroups/collierwebapi2016/providers/Microsoft.Web/sites/collierwebapi2016/metrics?api-version=2014-04-01&$filter=%28name.value%20eq%20%27AverageResponseTime%27%20or%20name.value%20eq%20%27Requests%27%29%20and%20timeGrain%20eq%20duration%27PT1M%27%20and%20startTime%20eq%202016-02-18T20%3A26%3A00.0000000Z%20and%20endTime%20eq%202016-02-18T21%3A26%3A00.0000000Z

The result should be similar to that of the screenshot below.

azure_web_app_metric_values


Using the REST API is very helpful in terms of understand the available metric definitions, granularity, and related values. This information can be very helpful when using the Azure Insights Management Library.

Retrieving Metrics via the Insights Management Library

Just like working with the REST API, there are three basic steps for working with the Insights Management Library:

  1. Authenticate the Azure Insights request
  2. Retrieve the available metric definitions
  3. Retrieve the metric values

The first step is to authenticate by retrieving the JWT token from Azure AD. Assuming the Azure AD service principle is already configured, retrieving the token can be as simple as shown in the code sample below.

Get Auth Token
  1. private static string GetAccessToken()
  2. {
  3.     var authenticationContext = new AuthenticationContext(string.Format(“https://login.windows.net/{0}”, _tenantId));
  4.     var credential = new ClientCredential(clientId: _applicationId, clientSecret: _applicationPwd);
  5.     var result = authenticationContext.AcquireToken(resource: “https://management.core.windows.net/&#8221;, clientCredential: credential);
  6.     if (result == null)
  7.     {
  8.         throw new InvalidOperationException(“Failed to obtain the JWT token”);
  9.     }
  10.     string token = result.AccessToken;
  11.     return token;
  12. }


The primary class for working with the Insights API is the InsightsClient. This class exposes functionality to retrieve the available metric definitions and metric values, as seen in the sample code below:

Get Metric Data
  1. private static MetricListResponse GetResourceMetrics(TokenCloudCredentials credentials, string resourceUri, string filter, TimeSpan period, string duration)
  2. {
  3.     var dateTimeFormat = “yyy-MM-ddTHH:mmZ”;
  4.     string start = DateTime.UtcNow.Subtract(period).ToString(dateTimeFormat);
  5.     string end = DateTime.UtcNow.ToString(dateTimeFormat);
  6.     StringBuilder sb = new StringBuilder(filter);
  7.     if (!string.IsNullOrEmpty(filter))
  8.     {
  9.         sb.Append(” and “);
  10.     }
  11.     sb.AppendFormat(“startTime eq {0} and endTime eq {1}”, start, end);
  12.     sb.AppendFormat(” and timeGrain eq duration'{0}'”, duration);
  13.     using (var client = new InsightsClient(credentials))
  14.     {
  15.         return client.MetricOperations.GetMetrics(resourceUri, sb.ToString());
  16.     }
  17. }
  18. private static MetricDefinitionListResponse GetAvailableMetricDefinitions(TokenCloudCredentials credentials, string resourceUri)
  19. {
  20.     using (var client = new InsightsClient(credentials))
  21.     {
  22.         return client.MetricDefinitionOperations.GetMetricDefinitions(resourceUri, null);
  23.     }
  24. }


For the above code, the resource URI to use is the full path to the desired Azure resource. For example, to query against an Azure Web App, the resource URI would be:

/subscriptions/{subscription-id}/resourceGroups/{resource-group-name}/providers/Microsoft.Web/sites/{site-name}/


It is also possible to query the metric data for a classic Azure Virtual Machine – just change the request URI to be appropriate for the classic VM:

/subscriptions/{subscription-id}/resourceGroups/{resource-group-name}/providers/microsoft.classiccompute/virtualmachines/{vm-name}/


To find the resource URI for a desired resource, one approach is to use the https://resources.azure.com tool. Simply browse to the desired resource and then look at the URI shown, as in the screenshot below.

resource_explorer


For the full code sample, please see my GitHub repository available at https://github.com/mcollier/microsoft-azure-insights-demo/.

Thanks to Yossi Dahan’s blog post at https://yossidahan.wordpress.com/2015/02/13/reading-metric-data-from-azure-using-the-azure-insights-library/ for the inspiration.

azure_web_app_metric_value_listing

Deploy a WordPress Azure Web App with an Alternative MySQL Database

I was recently presented with an interesting question about Azure Web Apps, WordPress, and MySQL. While not necessarily a “hard” question, the answer wasn’t as readily available as I first anticipated. I thought I would share my experience here in hopes of helping others.

The Question

How can you deploy a WordPress site using Azure Web Apps that uses a MySQL database instance that is not a ClearDB database available in the Azure subscription?

Background

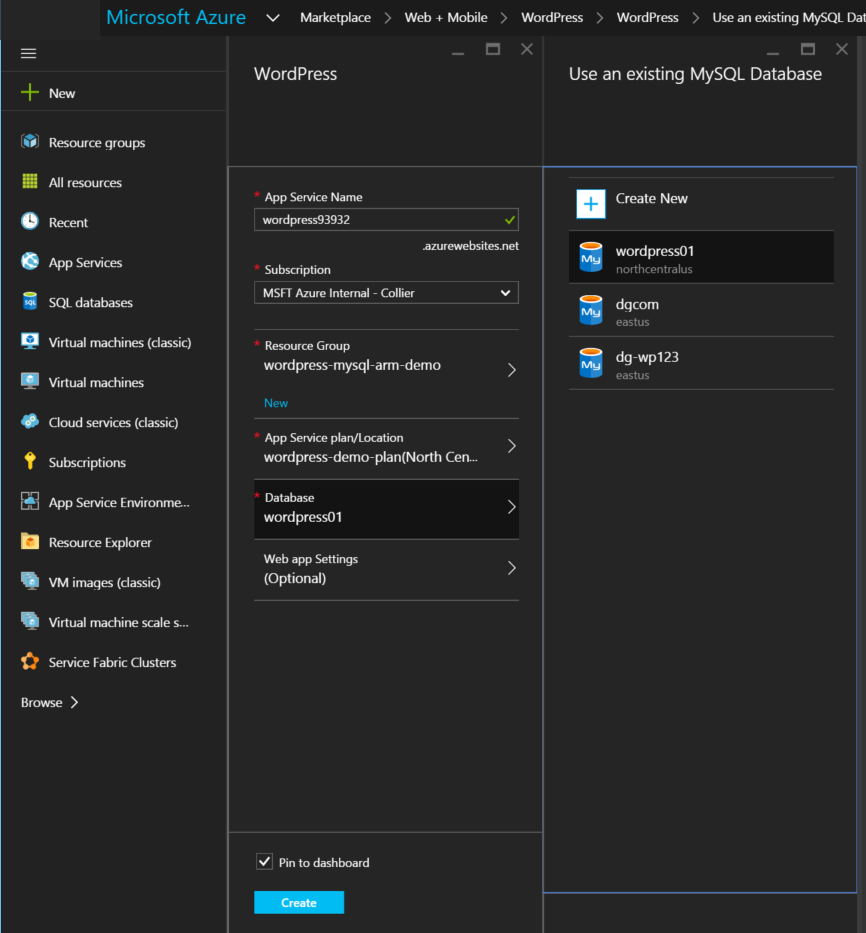
Normally when you create a WordPress site using Azure Web Apps you are presented with an option to select an existing ClearDB MySQL database, or create a new one. But what if you don’t want to use an existing instance or create a new one? What if you want to use a MySQL database instance deployed to an Azure VM or you have a ClearDB MySQL database that doesn’t show in the Azure Portal (e.g. one of the ClearDB Basic offerings)?

Create_WordPress_ClearDB_Normal

The Answer(s)

Like most technology related questions (or life in general), there are a few ways to solve this challenge. There is the “easy” way, and there is the more powerful, yet slightly more complicated, some would argue the “right” way.

The Easy Way

The easiest approach is to create a WordPress site with Azure Web Apps and select either an existing ClearDB database or create a new ClearDB database. Once the WordPress site is deployed, you can then change the database connection string in the wp-config.php file to be the database you want (e.g. a ClearDB Basic instance or a MySQL instance on an Azure VM).

  1. Let the WordPress site be deployed, but do not complete the installation. In other words, once the site is deployed, browsing to the site’s URL should result in the standard WordPress default installation prompt.
  2. WordPress_Default_Install_1
  3. Open the Kudu console by going to http://your-site-name.scm.azurewebsites.net. If you’re already signed into the Azure Portal, you should proceed through without any authentication challenge. Otherwise you’ll be challenged for your authentication credentials.
  4. Navigate to the Debug console (via the menu on the top). Browse to the \site\wwroot\ directory.
  5. Kudo_wpconfig_1
  6. Edit the wp-config.php file by clicking on the pencil icon to the left of the file name. Doing so will switch to an edit view for the file. Don’t click on the delete icon. . . that’d be a bad thing.
  7. Within the wp-config.php file, change the DB_NAME, DB_USER, DB_PASSWORD, and DB_HOST values to be that of the desired database. Save the file.
  8. WordPress_Default_Install_wpconfig_1
  9. Now reload your site – http://your-site-name.azurewebsites.net. This should load the default WordPress installation page prompting you to complete the WordPress installation.
  10. Complete the installation. This should use the database setting as configured in the wp-config.php file to finish the WordPress installation.
  11. If you created a free ClearDB database to start with, feel free to delete that ClearDB database.

The Alternative

And now the real fun begins! In this alternative approach, an Azure Resource Manager (ARM) template can be used to create the WordPress site on Azure Web Apps and wire up a database of your choosing. To make this happen you will need the ARM template and a MySQL database of your choosing.

To get the ARM template, my first thought was that I could download the template that the Azure Portal is using and simply modify the database connection details to be what I wanted. Wrong. The templates I tried turned out to be a bit more complicated that I wanted. However, they did provide a good start and helped me understand what I needed to do.

If you’re curious, you can get the templates by invoking the PowerShell script below.

# Retrieve all available items
$allGalleryItems = Invoke-WebRequest -Uri "https://gallery.azure.com/Microsoft.Gallery/GalleryItems?api-version=2015-04-01&amp;includePreview=true" | ConvertFrom-Json

# Get all items published by WordPress
$allGalleryItems | Where-Object { $_.PublisherDisplayName -eq "WordPress" }
$allGalleryItems | Where-Object { $_.Identity -eq "WordPress.WordPress.1.0.0" }

# Save default template for all items under directory "C:\Templates"
$allGalleryItems | Foreach-Object {
$path = Join-Path -Path "C:\templates" -ChildPath $_.Identity
New-Item -type Directory -Path $path -Force

$.Artifacts | Where-Object { $.type -eq "template" } | ForEach-Object {
$templatePath = Join-Path -Path $path -ChildPath ( $_.Name + ".json" )

(Invoke-WebRequest -Uri $_.Uri).Content | Out-File -FilePath $templatePath
}
}

(original PowerShell sample from https://github.com/Azure/azure-powershell/issues/1064)

Using the ARM template obtained from the gallery sample as inspiration, I created a new ARM template. You can get the full sample on my GitHub repo at https://github.com/mcollier/AzureWebApp-WordPress-AlternativeDatabase.

"resources": [
{
"apiVersion": "2014-06-01",
"name": "[parameters('hostingPlanName')]",
"type": "Microsoft.Web/serverfarms",
"location": "[resourceGroup().location]",
"tags": {
"displayName": "HostingPlan"
},
"properties": {
"name": "[parameters('hostingPlanName')]",
"sku": "[parameters('sku')]",
"workerSize": "[parameters('workerSize')]",
"numberOfWorkers": 1
}
},
{
"apiVersion": "2014-06-01",
"name": "[variables('webSiteName')]",
"type": "Microsoft.Web/sites",
"location": "[resourceGroup().location]",
"tags": {
"[concat('hidden-related:', resourceGroup().id, '/providers/Microsoft.Web/serverfarms/', parameters('hostingPlanName'))]": "Resource",
"displayName": "Website"
},
"dependsOn": [
"[concat('Microsoft.Web/serverfarms/', parameters('hostingPlanName'))]"
],
"properties": {
"name": "[variables('webSiteName')]",
"serverFarm": "[parameters('hostingPlanName')]"
},
"resources": [
{
"apiVersion": "2014-11-01",
"name": "connectionstrings",
"type": "config",
"dependsOn": [
"[concat('Microsoft.Web/sites/', variables('webSiteName'))]"
],
"properties": {
"defaultConnection": {
"value": "[variables('dbConnectionString')]",
"type": 0
}
}
},
{
"apiVersion": "2014-06-01",
"name": "web",
"type": "config",
"dependsOn": [
"[concat('Microsoft.Web/sites/', variables('webSiteName'))]"
],
"properties": {
"phpVersion": "5.6"
}
},
{
"name": "MSDeploy",
"type": "extensions",
"location": "[resourceGroup().location]",
"apiVersion": "2014-06-01",
"dependsOn": [
"[concat('Microsoft.Web/sites/', variables('webSiteName'))]",
"[concat('Microsoft.Web/Sites/', variables('webSiteName'), '/config/web')]"
],
"tags": {
"displayName": "WordPressDeploy"
},
"properties": {
"packageUri": "https://auxmktplceprod.blob.core.windows.net/packages/wordpress-4.3.1-IIS.zip",
"dbType": "MySQL",
"connectionString": "[variables('dbConnectionString')]",
"setParameters": {
"AppPath": "[variables('webSiteName')]",
"DbServer": "[parameters('databaseServerName')]",
"DbName": "[parameters('databaseName')]",
"DbUsername": "[parameters('databaseUsername')]",
"DbPassword": "[parameters('databasePassword')]",
"DbAdminUsername": "[parameters('databaseUsername')]",
"DbAdminPassword": "[parameters('databasePassword')]"
}
}
}
]
}

The most relevant section is the MSDeploy resource extension (around line 60). It is this extension that deploys WordPress and gets the default database connection string set up. You provide the database server name, database name, database username and database password as input parameters to the ARM template. The ARM template will use those parameters to construct a database connection string in the proper format (set in a variable in the template).

Once the template is created, it can be deployed with a few lines of PowerShell:

#Login-AzureRmAccount

#NOTE - Ensure the correct Azure subscription is current before continuing. View all via Get-AzureRmSubscription -All
#Select-AzureRmSubscription -SubscriptionId "[your-id-goes-here]" -TenantId "[your-azure-ad-tenant-id-goes-here]"

$ResourceGroupName = "dg-wordpress-001"
$ResourceGroupLocation = "East US"
$TemplateFile = "azuredeploy.json"
$TemplateParametersFile = "azuredeploy.parameters.json"

Test-AzureRmResourceGroupDeployment -ResourceGroupName $ResourceGroupName `
-TemplateFile $TemplateFile `
-TemplateParameterFile $TemplateParametersFile `
-Verbose

# Create or update the resource group using the specified template file and template parameters file
New-AzureRmResourceGroup -Name $ResourceGroupName -Location $ResourceGroupLocation -Verbose -Force -ErrorAction Stop

New-AzureRmResourceGroupDeployment -Name ((Get-ChildItem $TemplateFile).BaseName + '-' + ((Get-Date).ToUniversalTime()).ToString('MMdd-HHmm')) `
-ResourceGroupName $ResourceGroupName `
-TemplateFile $TemplateFile `
-TemplateParameterFile $TemplateParametersFile `
-Force -Verbose

The reason I like this approach is that it is very clear what is being deployed. I can customize the template however I like, adding or removing additional resources as needed. Plus, I don’t have to go through that “create a database just to delete it” dance.

For instance, I can envision a version of this ARM template that may optionally set up a MySQL database on an Azure VM. Oh . . . look here, https://azure.microsoft.com/en-us/documentation/templates/wordpress-mysql-replication/. Someone already did mostly just that! That template could be modified to have some options to allow for the creation of a database in a few different configurations. Thanks for saving me some work. Naturally I found this after I went through all the work above. Go figure!  🙂

Join me as a Cloud Solution Architect

Earlier this year I started a new chapter in my career as I joined Microsoft as a Cloud Solution Architect (CSA). Working for Microsoft has been a goal of mine for long time (since sometime in high school probably). Working for Microsoft in a role that allows me to continue working with Azure and solving interesting problems . . .  well, that’s just a lot of fun!

It is no secret that Microsoft is moving full steam ahead with Azure. The pace of innovation is mind blowing!  Part of my job as a CSA is to keep up on all the latest technologies in Azure – understanding how they really work and how to best leverage the various services/features to solve problems. It is a tough job, but someone has to do it. It is a fun job too!

The Azure platform is incredibly large. There are so many different services that is is in reality impossible to be an expert in all of the services. In that light, Microsoft has recently created a new role, the Data Solution Architect (DSA), that compliments the Cloud Solution Architect role. The DSA role focuses on data platform technologies such as Azure SQL Database, Machine Learning, HDInsight, etc. That allows the CSA role to focus on more of the compute and infrastructure services. Naturally, there is a bit of crossover in some areas . . . that is OK.

If you have ever wanted to work in Azure – in any capacity – now is a great time to join Microsoft. There are 292 current job openings currently showing on the Microsoft Careers site.

My team is currently hiring for both the Cloud Solution Architect and Data Solution Architect role. I currently work in SMS&P (that’s Microsoft speak for ‘Small and Midmarket Solutions & Partners’) in Central region for Microsoft. Current open positions include:

  • DSA – Austin, TX
  • CSA – Austin, TX
  • CSA – Minneapolis, MN
  • DSA – St. Louis, MO
  • DSA – Nashville, TN
  • CSA – Houston, TX
  • DSA – Chicago, IL
  • DSA – Milwaukee, WI
  • DSA – Indianapolis, IN

If you want to see the official job description for a CSA or DSA, check out the links below:

If a CSA or DSA sounds like something you would be interested, please contact me.

Being a CSA or DSA at Microsoft is a pretty cool job. But don’t just take my word for it; check out Walter Myer’s video below where he talks about his experience as a CSA.